How to Charge a Fitbit
Fitbit is a popular brand of wearable fitness trackers that allow one to monitor their daily physical activity, track their sleep patterns, and manage their overall health and fitness goals. However, some people are not able to figure out how to charge a Fitbit due to their non-conventional charging procedure.
Fitbit devices come equipped with a variety of features that enable users to track their progress and make adjustments to their exercise routines, diet, and lifestyle as needed. However, like all electronic devices, Fitbits require regular charging to function properly.
FitBit Charging Guide
In this guide, we will be discussing how to charge a Fitbit. Whether you have a Fitbit Versa, Charge, Inspire, or any other model, it’s essential to understand how to properly charge your device to ensure that it remains functional and continues to deliver accurate measurements and data.
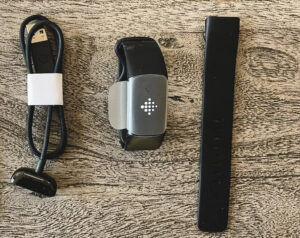
We’ll start by providing an overview of the different types of Fitbits and their unique features. Then, we’ll explain the different types of charging ports and cables that Fitbits use, so you can be sure you have the right equipment to charge your device.
Next, we’ll cover the steps you need to take to prepare your Fitbit for charging, including checking the battery life and cleaning the charging ports and cable. We’ll also give you tips on how to maximize the battery life of your device, so you can spend more time using it and less time charging it.
In the troubleshooting section, we’ll address common issues that users may encounter when charging their Fitbits, such as a slow charging rate, a dead battery, or a malfunctioning device. We’ll provide solutions to these problems, so you can quickly get back to using your Fitbit to achieve your health and fitness goals.
By the end of this post, you’ll have a comprehensive understanding of how to charge your Fitbit, and you’ll be able to keep your device charged and ready to use at all times.
Understand Your Fitbit
Fitbit offers a wide range of models and types of wearable fitness trackers. Each Fitbit model has its own unique features, so it’s important to understand the type of Fitbit you have before attempting to charge it.
A. Different Models of Fitbit
- Fitbit Versa – The Fitbit Versa is one of the more popular models, offering a sleek design, long battery life, and a range of health and fitness features. The Versa comes with a charging dock that connects to the back of the device.
- Fitbit Charge – The Fitbit Charge is another popular model that offers an OLED display, heart rate monitoring, and smartphone notifications. The Charge has a charging cable that connects directly to the device’s USB port.
- Fitbit Inspire – The Fitbit Inspire is a budget-friendly model that offers basic health and fitness features such as step tracking, calorie tracking, and sleep tracking. The Inspire has a charging cable that connects directly to the device’s charging port.
B. Charging Ports and Cables
- Charging Ports -Fitbits have two main types of charging ports: charging docks and charging cables. Charging docks are typically used with models like the Fitbit Versa, while charging cables are used with models like the Fitbit Charge and Inspire.
- Charging Cables – Fitbit charging cables are typically designed to connect to a USB port, which means you can charge your device with a laptop or computer. Some Fitbits may also come with a wall adapter that allows you to charge your device directly from an electrical outlet.
C. Checking the Battery Life of Your Fitbit
Before charging your Fitbit, it’s important to check the battery life of your device. To check the battery life, you can swipe down from the top of your Fitbit’s screen to view the battery percentage.
It’s important to note that the battery life of your Fitbit will vary depending on the model you have and how frequently you use it. For example, a Fitbit Versa may have a battery life of up to 4 days, while a Fitbit Inspire may have a battery life of up to 5 days.
D. Cleaning the Charging Ports and Cable
Over time, the charging ports and cable of your Fitbit may accumulate dust, dirt, or other debris. It’s important to clean these areas regularly to ensure that your device charges properly.
To clean the charging ports and cable of your Fitbit, you can use a soft, dry cloth to gently wipe away any debris. Avoid using water or other liquids to clean your Fitbit, as this can damage the device.
How to Charge a Fitbit
I. Preparing to Charge Your Fitbit
Before charging your Fitbit, there are a few steps you should take to ensure that the device is ready to be charged. In this section, we’ll cover the steps you need to take to prepare your Fitbit for charging.
a. Checking the Battery Life of Your Fitbit
The first step in preparing to charge your Fitbit is to check the battery life of your device. As mentioned above, you can check the battery life of your Fitbit by swiping down from the top of your device’s screen.
If your Fitbit has a low battery life, you’ll need to charge it before using it again. Charging your Fitbit when the battery is low will help ensure that the device functions properly and delivers accurate data and measurements.
b. Cleaning the Charging Ports and Cable
The next step is to clean the charging ports and cable. Over time, these areas may accumulate dust, dirt, or other debris, which can interfere with the charging process.
To clean the charging ports and cable of your Fitbit, you can use a soft, dry cloth to gently wipe away any debris. Be sure to clean both the charging port on your device and the cable that connects to it.
c. Checking the Charging Cable
Before charging your Fitbit, you should also check the charging cable to ensure that it’s in good condition. Look for any signs of damage or wear, such as frayed wires or a damaged USB connector.
Using a damaged charging cable can cause your Fitbit to charge slowly or not at all, so it’s important to use a cable that’s in good condition. If your charging cable is damaged, you should replace it before attempting to charge your Fitbit.
d. Connecting Your Fitbit to the Charging Cable
Once you’ve checked the battery life of your Fitbit, cleaned the charging ports and cable, and verified that your charging cable is in good condition, you’re ready to connect your Fitbit to the charging cable.
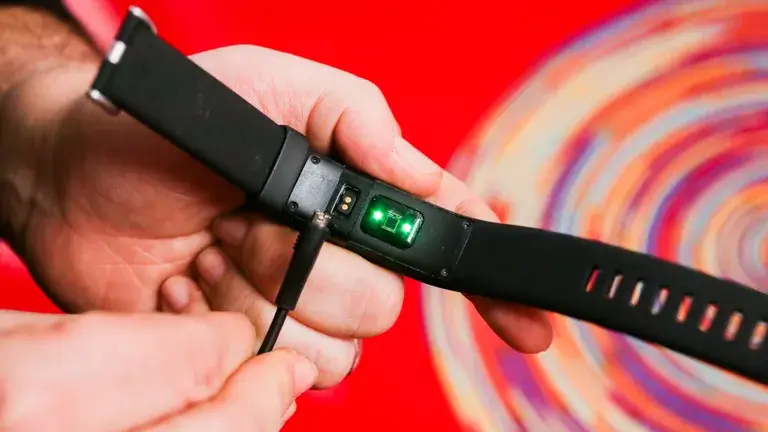
The method for connecting your Fitbit to the charging cable will vary depending on the model you have. In general, however, you’ll need to follow these steps:
- Locate the charging port on your Fitbit. This may be located on the back of the device, or on the side of the device depending on the model you have.
- Insert the charging cable into the charging port on your Fitbit. Be sure to insert the cable gently, and avoid forcing it into the port.
- Connect the other end of the charging cable to a USB port on your computer, or to a wall adapter if your Fitbit came with one.
- Wait for yourFitbit to begin charging. Depending on the model you have, you may see a battery icon on the screen that indicates that the device is charging.
- Tips for Maximizing the Battery Life of Your Fitbit
In addition to preparing your Fitbit for charging, there are a few tips you can follow to help maximize the battery life of your device:
- Turn off unnecessary features. If you’re not using certain features on your Fitbit, such as GPS or Bluetooth, you can turn them off to conserve battery life.
- Adjust the screen brightness. The brighter your Fitbit’s screen, the more battery life it will use. Adjusting the screen brightness can help conserve battery life.
- Disable Always-On Display. If your Fitbit has an Always-On Display feature, you can disable it to save battery life.
- Use the Battery Saver feature. Many Fitbit models come with a Battery Saver feature that will automatically turn off certain features when the battery level gets low.
- Keep your Fitbit up to date. Fitbit regularly releases firmware updates
II. Charging Your Fitbit
Now that you’ve prepared your Fitbit for charging, it’s time to actually charge the device.
a. Connect Your Fitbit to a Power Source
The first step in charging your Fitbit is to connect it to a power source. This can be done by connecting the charging cable to a USB port on your computer, or by connecting it to a wall adapter if your Fitbit came with one.
b. Insert the Charging Cable or Dock into Your Fitbit
Once you’ve connected the charging cable to a power source, you’ll need to insert the other end of the cable into your Fitbit. The method for doing this will vary depending on the model you have.
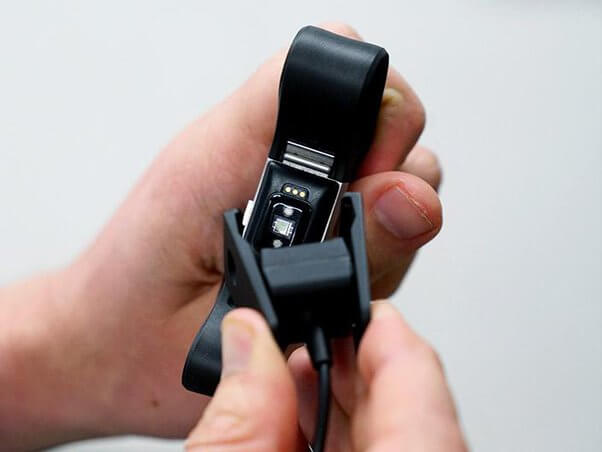
For many models, the charging cable simply needs to be inserted into the charging port on the back of the device. Some models, however, may have a different type of charging port.
Be sure to insert the charging cable gently and avoid forcing it into the port. If the cable doesn’t seem to fit correctly, double-check to make sure that you’re inserting it into the correct port.
c. Monitor the Charging Progress
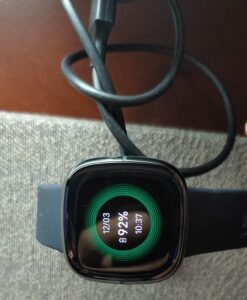
Once your Fitbit is connected to a power source and the charging cable is inserted, you can monitor the progress of the charging process. Depending on the model you have, your Fitbit may display a battery icon on the screen that indicates that the device is charging.
You can also check the battery level of your Fitbit by swiping down from the top of the device’s screen. This can help you determine how much longer the device needs to charge before it’s fully charged.
d. Tips for Ensuring a Smooth Charging Process
While charging yourFitbit is a relatively straightforward process, there are a few tips you can follow to ensure that the charging process goes smoothly:
Avoid Overcharging Your Fitbit
While it’s important to ensure that your Fitbit has enough battery life to function properly, it’s also important to avoid overcharging the device. Overcharging can cause the battery to degrade more quickly, reducing the overall lifespan of the device.
To avoid overcharging your Fitbit, be sure to unplug it from the power source as soon as it’s fully charged. If you’re not sure when your Fitbit is fully charged, check the battery level by swiping down from the top of the screen.
Keep Your Fitbit Clean
Keeping your Fitbit clean can help ensure that the charging process goes smoothly. Be sure to regularly clean the charging ports and cable to remove any dirt, dust, or debris that may be interfering with the charging process.
Use a Wall Adapter for Faster Charging
While it’s possible to charge your Fitbit using a USB port on your computer, using a wall adapter can result in faster charging times. This is because wall adapters typically provide more power than USB ports.
If your Fitbit came with a wall adapter, be sure to use it for the fastest charging times. If not, you can purchase a compatible wall adapter separately.
Avoid Using Non-Official Charging Cables
While it may be tempting to use a non-official charging cable to charge your Fitbit, doing so can be risky. Non-official charging cables may not be compatible with your Fitbit, or may not provide enough power to charge the device properly.
To ensure that your Fitbit charges properly and safely, it’s best to use the official charging cable that came with the device.
Troubleshooting Common Charging Issues
While charging your Fitbit is typically a straightforward process, there are some common issues that can arise. Here are some tips for troubleshooting common charging issues:
Charging Cable Not Fitting Correctly
If you’re having trouble inserting the charging cable into your Fitbit, double-check to make sure that you’re inserting it into the correct port. If you’re still having trouble, try cleaning the charging port and cable to remove any dirt or debris that may be interfering with the connection.
Fitbit Not Charging
If your Fitbit isn’t charging at all, there are a few things you can try:
- Check to make sure that the charging cable is securely connected to both your Fitbit and the power source.
- Try using a different USB port or wall adapter to see if the issue is with the power source.
- Check the charging cable for any damage or wear and tear, and replace it if necessary.
Fitbit Not Fully Charging
If your Fitbit isn’t fully charging, there are a few things you can try:
- Ensure that you’re using the correct wall adapter or USB port. Using a wall adapter may result in faster charging times.
- Avoid using your Fitbit while it’s charging, as this can slow down the charging process.
- Try restarting your Fitbit to see if this helps the charging process.
Fitbit Battery Draining Quickly
If your Fitbit battery seems to be draining quickly, there are a few things you can try:
- Avoid using battery-intensive features such as GPS tracking or music playback for extended periods of time.
- Make sure that your Fitbit is running the latest software update, as updates can sometimes improve battery life.
- Try restarting your Fitbit to see if this helps improve battery life.
Fitbit Won’t Turn On
If your Fitbit won’t turn on, try the following steps:
- Make sure that your Fitbit is charged properly.
- Restart your Fitbit by holding down the button for 15 seconds.
- Check for any damage or wear and tear on your Fitbit and charging cable.
If you’re still experiencing issues with your Fitbit, check the manufacturer’s website for further troubleshooting tips or contact customer support for assistance. By following these troubleshooting tips, you can resolve common Fitbit issues quickly and easily.
Fitbit Display is Unresponsive
If your Fitbit’s display isn’t responding, try the following steps:
- Ensure that your Fitbit is charged properly.
- Restart your Fitbit by holding down the button for 15 seconds.
- Check for any damage or wear and tear on your Fitbit and charging cable.
- Ensure that your Fitbit’s sensors are clean and free of dirt or debris.
Fitbit Overheating
If your Fitbit is overheating, try the following steps:
- Remove your Fitbit from the charger and allow it to cool down.
- Ensure that your Fitbit isn’t exposed to direct sunlight or extreme temperatures.
- Check for any damage or wear and tear on your Fitbit and charging cable.
- Try charging your Fitbit in a cooler location.
Closing Remarks
Charging your Fitbit is a straightforward process that can be accomplished in just a few simple steps. By understanding your Fitbit’s charging requirements, preparing your device for charging, and following the recommended charging practices, you can ensure that your Fitbit stays powered up and ready to use whenever you need it.
It’s also important to keep in mind that troubleshooting may be necessary from time to time. By knowing how to troubleshoot common issues such as syncing problems, unresponsive displays, or overheating, you can quickly resolve any issues that may arise and keep your Fitbit running smoothly.
Finally, it’s worth noting that the charging process may vary slightly depending on the model of your Fitbit. Always refer to the manufacturer’s instructions or user manual for specific instructions on how to charge your device.
In summary, charging your Fitbit is a simple process that can be easily integrated into your daily routine. By following the steps outlined in this guide, you can keep your Fitbit charged and ready to help you achieve your fitness goals.


